Spraycan 2012 technical details
The goal of this project was to learn SideFX Software's Houdini, by taking a project from concept through to a completed film. Completing all aspects of the production myself means that I have had to work especially hard on learning and improving in areas of weakness, in order to meet an overall minimum standard of quality for the project. It was challenging but rewarding!
Concept
The concept evolved from an idea of having a spray can pop and paint some graffiti on a wall. Around that time, I was exploring the work of local hip hop artists; I noticed the graffiti-style logo, and the idea formed that the can could fill with their music, and when no longer able to be contained, burst and roll away with the music escaping.
Modelling
The geometry was created with Houdini's polygonal modelling tools, in the form of a Houdini Digital Asset (HDA), which allows animation controls to be abstracted into simple UI elements available at the object level.
This is possible because the procedural SOP network allows multiple, inter-related deformations and changes. In particular;
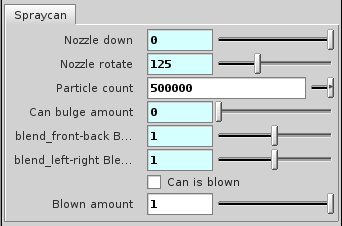
- No matter how the can is deformed or oriented, the nozzle can rotate and optionally be pressed down (which subsequently drives the particle emission)
- The can can bulge, and be deformed as the bulging increases
- The can can be in the form of either the solid or ‘popped’ geometry, and where popped, blend between different amounts of tear in the metal.
Shading
I made basic PBR shaders using the Houdini Surface Builder shader type. The colour/spec/bump channels are mostly image maps, created with Inkscape (vector) and GIMP (raster) packages.
Lighting
I used HDR Shop to create an HDR map (silver ball technique), from photos taken when shooting the video footage.
The lighting setup was straightforward; a Houdini environment light (to emit the HDR) together with a point light (to provide the hard shadow, additional specularity, and to help tweak the scene colour).
Particles
Particles were done with POP networks within Houdini. The biggest challenges were in attaching the particles to the deformable geometry (the concept of an object merge was a revelation in the way I think about Houdini), and also to get consistent particle size between scenes.
Dynamics
A Rigid Body Dynamics (RBD) simulation provided movement for the can around the scene. I experimented with ‘guiding’ the simulation to end with the can in the desired orientation; however this was an exercise in frustration so it was ultimately trial-and-error in tweaking the simulation variables to have the can finish in the right spot.
Animation
As the spray can object had been setup as a Houdini Digital Asset (HDA), animation was a matter of keyframing changes in UI controls at the object level. Houdini dynamics was used to make the can pop and roll away.
The biggest challenge with animation was syncing keyframes to the audio tracks, and Houdini helped in this regard:

- I was able to import audio tracks into the animation timeline, meaning Houdini showed a visual representation of the audio frequency graph in relation to the frames – this helped to roughly block keyframes to match visible changes in the audio track:
- I was then further able to refine the timings by quickly rendering flipbooks of the viewport, and playing these animations back with the audio tracks – all within the Houdini workspace.
Rendering
I used takes to setup render layers, which were rendered with Mantra PBR.
I rendered to the Houdini picnc file format using deep-rasters, which meant that multiple, related channels could be rendered with one click.
Rendering of the particles required more power than my modest computers provide, so being able to use Houdini cloud rendering to fill the gap, immediately, was very helpful.
Video tracking
Having sketched some storyboards, I shot the footage using a consumer-grade camera (1280x720@50fps) and tracked with PF Hoe. I soon realised that less scenes would have been less work, and that video shot with a tripod would have made tracking easier, but I wanted the hand-held look and the practice in tracking six scenes did not hurt.
Compositing
Compositing of render layers and backgrounds was done within Houdini using COPs.
Having rendered to the Houdini picnc file format using deep-rasters, I was able to extract multiple channels from the .picnc files, which reduced the number of rendered frames to manage (particularly helpful with file storage and backups).
Sound Effects
Audio work was done with Audacity. I gained an appreciation for the art of sound engineering!
Video Editing
I used Adobe Premiere (yay for monthly rental).
Video Encoding
Out of necessity, I learnt about video codecs, container files and bit-rates in order to produce a high quality mp4 for download on this site, together with lower quality mp4 and webm formats, suitable for html5 video playback.
Summary
At times, the entire project depended on solving key challenges - for example, attaching the particles to the nozzle. Overcoming these challenges required research, communicating with other Houdini artists, trial-and-error, and thinking about problems in a different way in order to solve them, or to develop workarounds where appropriate.